| moppius | 2004-10-28 02:58 PM |
Normal-Mapping in 3dsmax 7 - It's easy!
1 Attachment(s)
Step 1:
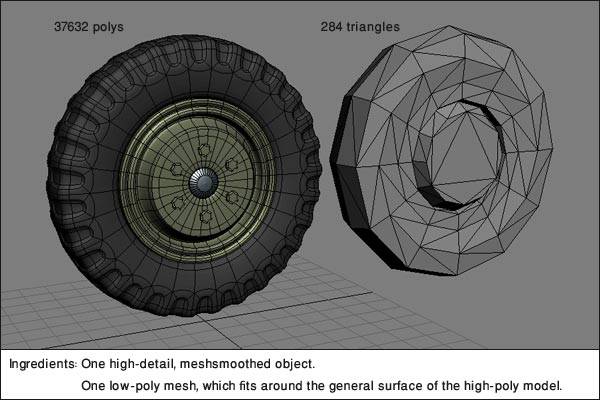
| http://www.cgchat.com/forum/ |
|
Normal-Mapping in 3dsmax 7 - It's easy!
1 Attachment(s)
Step 1:
|
1 Attachment(s)
Step 2:
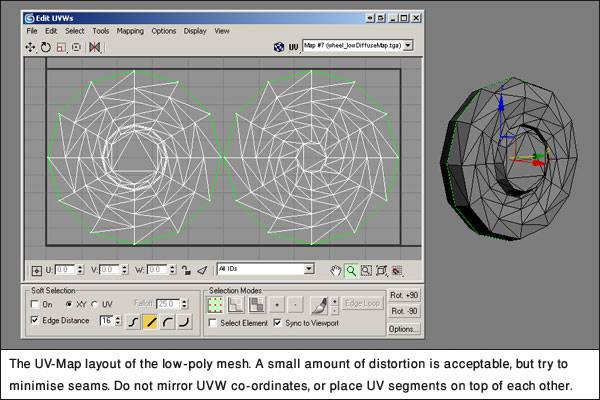 |
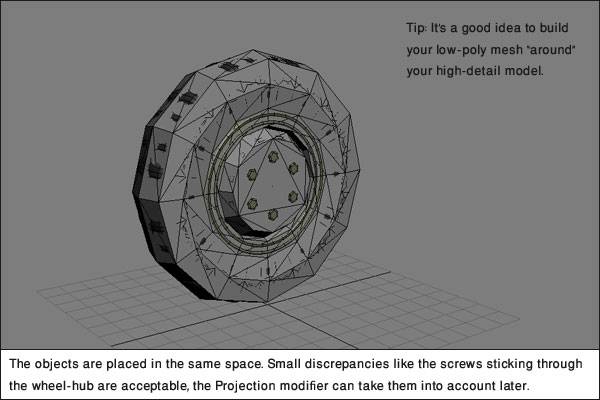
1 Attachment(s)
Step 3:
 |
1 Attachment(s)
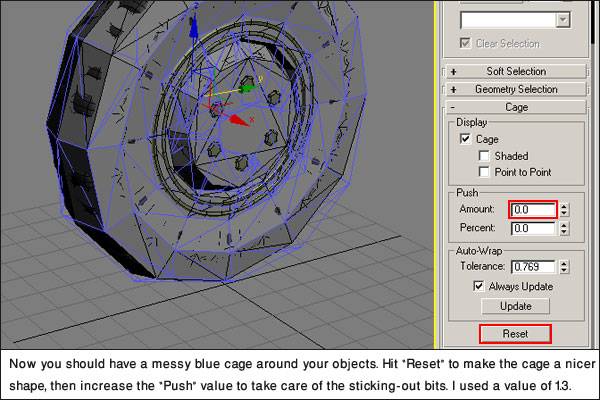
Step 4:
 |
1 Attachment(s)
Step 5:
 |
1 Attachment(s)
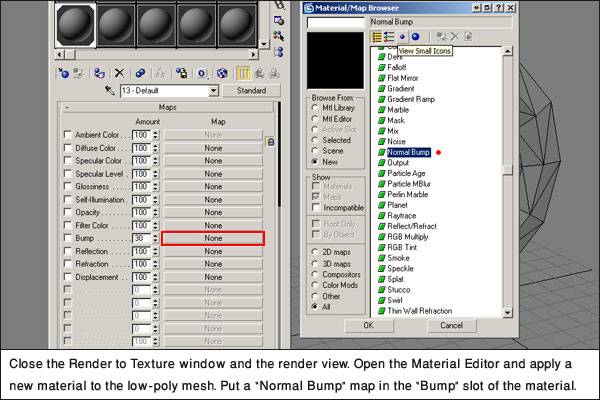
Step 6:
 |
1 Attachment(s)
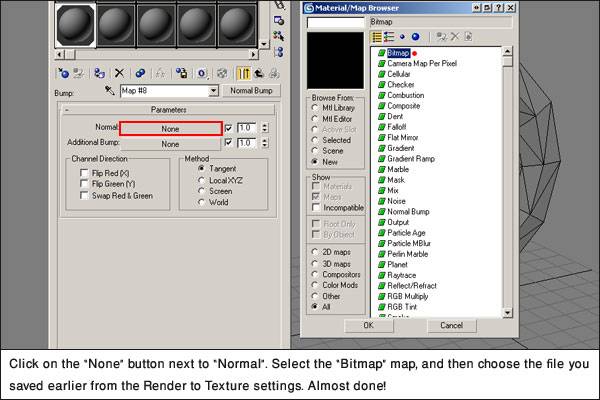
Step 7:
 |
1 Attachment(s)
Step 8:
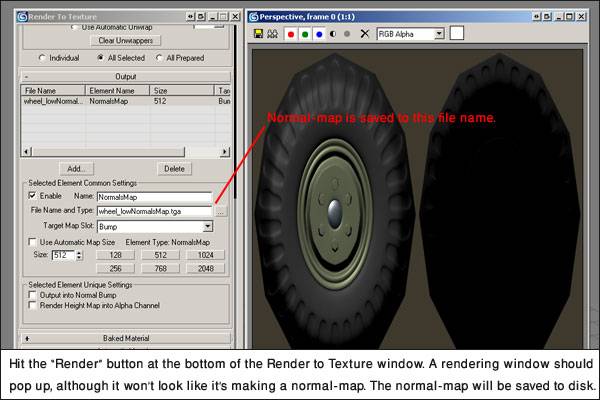 |
1 Attachment(s)
Step 9:
 Oops! I forgot to include that you should change the "Bump" value from 30 to 100, or when you display the map in the viewport, it won't look quite right. |
1 Attachment(s)
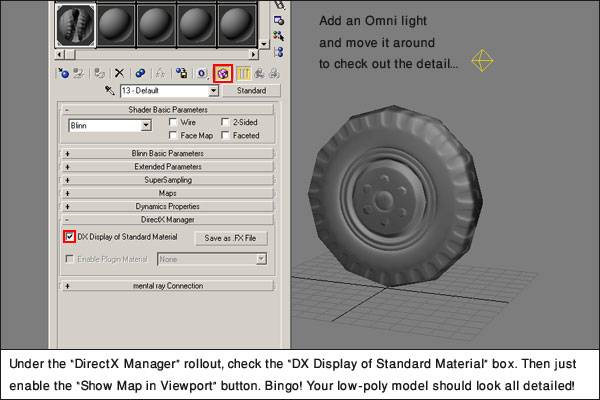
Step 10:
 |
1 Attachment(s)
Final step!
 |
That's all, folks.
Hope some people find it useful - it's fairly straightforward stuff, but just to make sure everyone's on the right track, yeah... :) You can use this technique for rendering anything like Diffuse or Specular maps from a high-poly object to a low-poly mesh too, just select a different map instead of "NormalsMap" when you're setting up the Render to Texture stuff. If you don't have Max7, and want to give this stuff a try, go to http://www4.discreet.com/3dsmax/ and sign up for the free 30-day trial! All of the above images are Copyright (c) 2004 Paul Greveson. The models were created by myself. |
*save as...*
thx alot MoP, this tutorial is really user-friendly and more than usefull :) thx again -8 |
Very good tutorial, thanks Mop!
|
1 Attachment(s)
No problem guys. It was a learning experience for me too! :)
Now, for further examples: 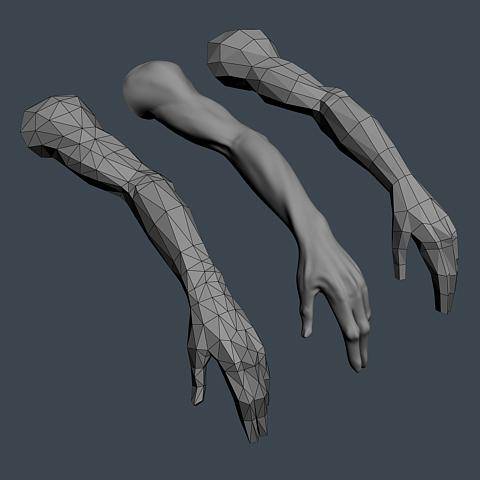 I figured I'd try something organic. I dug out an old arm from a troll model I did a couple of years back. The arm itself isn't so bad, but the hand was a crappy mesh, ahh well. It's just a test. On the right of the render below, you can see the "source" mesh. This was 426 tris, modelled in quads. It was exported to ZBrush from Max using the .OBJ exporter from HABware, preserving the quad geometry (much easier to work with than triangles in ZBrush). I divided and sculpted the mesh in ZBrush, down to about 5 subdivisions. Didn't add that much detail, just enough to be obvious on a normal-map. Then I exported the ZBrushed mesh to .OBJ format and brought it back into Max. It sits at just under 110,000 tris. That mesh is in the middle of the render below. Smooth! Then I duplicated the original source mesh, triangulated and edited it, adding some polys to account for shape changes, and trying to keep good poly flow. You can see this mesh on the left of the render below. It has 520 triangles. Don't rely on just using the source mesh, or the 0-level subdiv mesh from Zbrush, as a low-poly game model, since it probably won't be properly set up for deformation and even vertex-lighting. |
1 Attachment(s)
Now, in the render below, you can see the new edited low-poly mesh occupying the same space as the ZBrushed model.
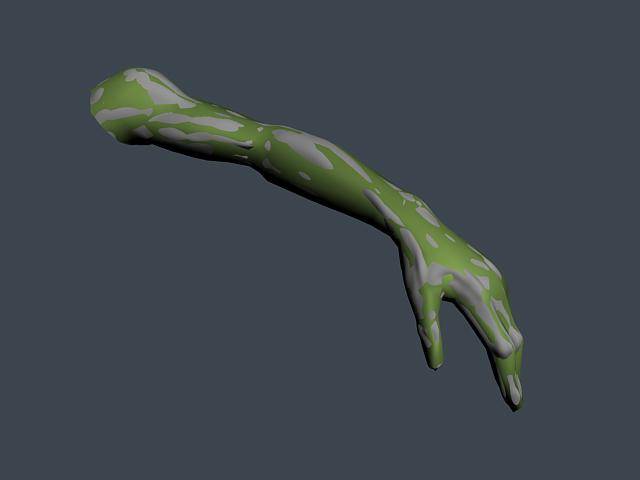
The green geometry is the lowpoly mesh, the grey geometry sticking through is the ZBrushed model. I think that this is an acceptable way to set up for normal-mapping: the lowpoly model has the average silhouette and surface shape of the highpoly model. It is neither entirely inside or entirely outside the highpoly model, so the low-poly version does not look too thin or bulky, respectively. I then did all the steps described in the tutorial above, but with a Push of just 0.5 on the Projection modifier, it could have possibly been even less but I just wanted to make sure it got all of the highpoly geometry inside the ray-casting cage. |
1 Attachment(s)
Now, the finished normal-map!
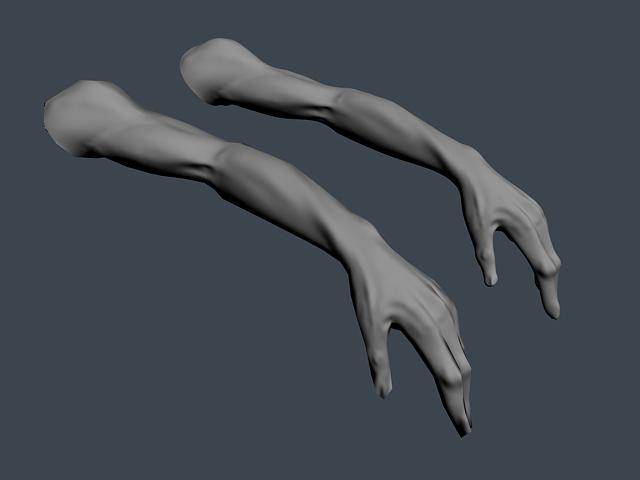 See if you can tell which mesh is the low-poly, and which is the high-poly! :) The low-poly silhouette is almost identical to the high-poly silhouette, and all the detail from the ZBrushed model has been captured and rendered into the uv-maps of the lowpoly model by Max7. Soon I'm gonna have to do something that actually looks GOOD with this... hehe :) |
Great tutorial! thanks, but just wanted to let you know you could avoid a couple steps, if you hit the checkbox in the render to texture to
"render to normal bump" it would auto put in the material in a normal bump for you. |
Yes, that's true. Good point!
|
wow, really excellent tutorial, thanks a bunch.
Btw. the bottom one is the lowpoly/normalmapped model :) |
This explains the process much easier. Thankyou so much :D
|
good tut, but having a wee issue. i cant find the Direct X manager rollout. i've hunted high and low but theres no sign of it. whats a young fellow to do?
|
ninjacore: It should be in the Material Editor, near the bottom of the list of rollouts.
Of course, your viewport needs to be rendering in DirectX 9 mode, I don't know if DX8 will work this way, and OpenGL or Heidi software rendering definitely won't. You can check that in the Customize -> Preferences menu, I think. Your video card has to be DX9 compatible, too. |
yeah i had a feeling it may have been an issue with the gfx card and i think it is. there is no option for me to switch to directx rendering. i'll just have to wait till tuesday when i get my new card. thanks :D
|
thx for the normal mapping tutorial it is very handy.
Ive a question with relation to texturing the low poly version of a character that has had a normal map generated from a high rez version. How do you get the texturing correct on the low poly version and get the texture to match up with the normal map info so as to look correct with relation to the colour information on the low poly version. any help on thhi will be greatly appreciated cheers Ben |
btw, for ppl who doesn't have a compatible card with DirectX9 (like me :D)
You can also use the "metalbump9" (it is his name in max 6), located in the material editor too. (You have to be in Direct3D mode to get the metalBump menu) I'm using it with .dds (DTX compression) format but I think it works too with .tga or anything else image format. http://www.guntharf.easynet.be/brol/metal%20bump.jpg |
nice easy to follow tute.
i can't get the dx display or the metalbump9 to work, would this be because of my graphics card- i have a nvidia4mx440. also the results i get are awful, would this be because the low poly model is too low so it therefore doesn't match the high poly one well enough. i can email an example to someone (3dmax7) to explain better |
Followed first tutorial and ran into a few problems
I went through the tutorial step by step on some pants for a character i have.
I ran into these problems, somebody please help. 1. Right when i clicked RENDER i got this? what is this? is it a problem? i just clicked continue. http://www.pseudo-pod.com/temp/n1.jpg 2. I could not find the DX shader button for in viewport viewing of the normal map. is this because i'm running opengl? i dont even have that rollout. 3. This is what my normal map looks like, what the hell is up with the mesh lines in the normal map!?!? i dont know how this happened, but other than that it would be fine i think. http://www.pseudo-pod.com/temp/n2.jpg thank you |
well, i'm pretty sure now for me it's my graphic card that doesn't allow me to view the normal map in real-time.
As for the dx shader button, it's located in the materials dialogue box down the bottom. My maps have improved slightly since my last posting so maybe it's just a case of practice. If you're looking for another tute there's a good one on discreets' website at http://www4.discreet.com/3dsmax/3dsmax.php?id=870 your image links aren't working |
ah man sorry about that. ok they are working now.
thank you |
Ok, so i've separated out ALL uvs for the pants, basically what i mean is nothing overlaps. no shared space. then i did a high resolution version really quick, then i followed both tutorials, and the end result of either of them is close to this attached image.
http://www.pseudo-pod.com/temp/n3.jpg As you can see, the image on the left is the Normal map, i assume that the odd problems in it were from my cage, i dont know. next to that in the viewport you can see my light. its just a straight forward spot light. and then in the upper right you can see my render! i dont know whats going on, but the lighting is all over the place, there shouldn't even be light on the side like that? what is going on, its boggling me, it should be so simple. thank you |
if your graphics card supports normal mapping you should be able to put a light into the scene and move it about so u can see it reacting with the models' normal map, give it a go, does it look like it's a high poly model?
|
1 Attachment(s)
Thx moppius for the education. Im running into a slight problem though. When I render out the texture its blank or if Im lucky just a few pieces of the red showing missed lighting. Any help.
Heres the pieces Im using |
I've been messing myself up by not reseting xform on a model i was working with, so remember to do that! anyways even with that said i'm still having the same old problem with the lighting on the normal map in max using Nvidias Melody tool as i was using max's internal one.. Same thing, so close it makes me sad. i dont know what is doing it. i attached a pic
http://www.pseudo-pod.com/temp/n4.jpg The normal map itself appears to be pretty cool, so i dont know what the hell is going on. |
ok, so i was finding that one leg was usually working out right, but the other leg was jacked up. in fact everything was basically inverted, so the bumps looked like indents and all the shadows were reversed, and i got to thinking.. may be i have to flip my uvs on the one leg. so i went in and flipped the uv section for both the high res and low res version... re generated the normal map and now both legs look fine when lit from the front, but the light is going all the way through to the back of the pants!!! and when i put the light at the back it renders it all in shadow!
i'm about to kill myself |
I registered just to THANK YOU for this beautiful easy to follow tutorial!
I've got a stupid newb question.. Do Geforce 3 cards support normal mapping? I've read else where I need a card which supports pixel shader 2.0 or something, and yet other sites suggest it can be done with a geforce 3. I did try to play with normal maps for a while and couldn't get them to work for me so I'm wondering if it's a hardware limitation or just that I don't know what I'm doing yet. I've spent the past 14 hours today trying to bake a texture from a high poly object onto a low poly object with not much success, and in fact I was about to give up and think of another solution until I found your tutorial! So thanks again. Now maybe I can get some sleep tonight.. well today.. ha ha. I'm going to be a dweeb an answer my own question. I did manage to get my normal map displaying correctly on my geforce 3, even using a directx 9 shader, not the metal bump material. |
Oops, I've been neglecting this thread! :o
rv_el: I've actually had the same lighting problem as you describe - unfortunately I think it's a 3dsmax bug, I can't find a way round it with the DX Display material. You can use the original Metal Bump shader instead of the DirectX9 features, though, and I find that usually displays properly, although it has less options for texture maps... it should be enough to get a good viewport preview though. Cleptocat: Make sure your Projection cage isn't being intersected by any of the highpoly geometry (turn on the Shaded option in the Cage rollout of the Projection modifier, it helps)... I can't think what else could be wrong, because I've done stuff like that with flat plane geometry before, and it's been fine. |
Excellent tut mop, very simple and easy to understand. :)
|
MoP, good one. Thanks for this.
I think it's worth mentioning that you can mirror and overlap your UVs as much as you like... just make sure to move all the UVs 1 unit out of the 0-1 UV box, leaving only the non-mirrored UVs and only one of each overlap UV within. We do this so we can still cast the normals accurately, but keep the mirroreds and the overlaps in the correct alignment, since they're offset exactly 1 UV unit. The only difference is that they're sitting outside the 0-1 casting area, so they don't cause Render To Texture problems. Also might help to mention the whole Nvidia vs. ATI green channel up/down fiasco. ATI expects the green channel of the normal map to point the normal upwards, while NVIDIA expects it to point downwards. I think the MetalBump shader uses the NVIDIA method, but I had an Nvidia card when I tested that. To switch a map from one format to the other, you can simply invert (negative) your green channel. This might be the cause of your MetalBump shading woes... Thanks again MoP! |
Thanks guys. Its odd because the inverted lighting was happening on only half of the model, and i actually fixed it by flipping the uvs (horizontal) of just that piece that was wrong. And then i redid the normal map and it fixed it. Which was odd to me cause that should not effect anything :/. (this was on the MAX genereated one, i think on the Melody one the whole thing was inverted kind of like you guys are describing.. )
I'm doing a new character now, its going to probably be 2 maps, one for upper body, one for lower with a normal map for each on completely non overlapping UV's. I'm going to do up the model in Z brush and then see about doing normal mapps out of Z Brush, Melody, and Max and see what results i get. Hopefully i wont run into the same pitfalls i did before with inverted lighting. |
| All times are GMT -4. The time now is 02:14 PM. |
|
Powered by vBulletin Version 3.5.4
Copyright ©2000 - 2006, Jelsoft Enterprises Ltd.