|
Beautiful, Yet Friendly Part 1: Stop Hitting the Bottleneck Beautiful, Yet Friendly Part 2: Maximizing Efficiency Beautiful, Yet Friendly Part 1: Stop Hitting the Bottleneckby Guillaume ProvostA couple of years ago I was driving home to Quebec when I stopped near the Ontario border to gas up. I got out of my car to stretch and noticed two other travelers engaged in a complicated mish-mash of hand waving and broken English. I approached, thinking I could help the poor fellows by acting as a translator between both parties, when I realized that not only were they both French Canadians but neither of them knew it. If I found the situation amusing at the time, I've since come to realize that specialized jargons aren't so different from languages as different as French and English. Likc languages, jargon plays a key role in communicating information about a given discipline: but like languages, jargon can also erect artificial barriers between initiates and neophytes. Game development studios comprise numerous different professions, each with their respective jargons. In the time I've spent bridging the gap between art and code at Pseudo Interactive, it has often been challenging -- but ultimately much more fulfilling -- to try and explain concepts to artists. As any experienced game artist knows, dealing with a disgruntled graphics programmer mumbling about "vertex diets" isn't the most enthralling part of the day. In our programmer minds, every model should be hand-tuned and lovingly optimized, and every artist should know the intricacies of the hardware and software they are dealing with. But in the end, a programmer's job isn't to make a good-looking game, it's to empower the artists to make a good- looking game. In this two-part article on graphics performance, I will attempt to explain how to manage performance without losing track of this vision statement. In this month's part, we will take a look at the big picture and explain how you can often solve performance problems without optimizing a single mesh. We will also see when, if, and what to optimize in your scene. In next month's conclusion, we will get down to the details and study how certain modeling practices can improve the performance of your meshes with minimal impact on their visual quality.
I was happily debugging the other day when an artist dropped by my desk and asked me how many vertices he could pack in a cubic meter without encountering performance problems. Put on the spot, I simply replied, "Ask level design." Although I intended that as a joke, it wasn't exactly bad advice. Programmers can accurately predict how many vertices you can pack into view, but how many "cubic meters" are actually in view at one time is largely determined by level design, not code. Viewed in this light, level designers operate in a kind of performance macrocosm, and their work provides your best indication of the performance constraints in which you are operating. In fact, on a performance scale, it's a lot easier for things to go wrong in level design than in art. Highly occluded environments that rely on portals and potential visible sets, for example, can suffer greatly from having several portals aligned into view. And instancing a mesh a thousand times in a room isn't likely to be performance friendly no matter how optimized it is. Balancing level complexity and prop complexity is generally the combined job of the game designers and level designers, but as an artist you'll benefit greatly from knowing in which contexts objects are used. Carefully optimizing meshes can be a tedious, thankless task. Making sure you pay attention to those objects that count most first will get you the most out of the system for the least amount of work. At Pseudo Interactive, levels are always hashed out first using rudimentary geometry. Once the level has been play-tested and the rough placement of game-logic items has been ironed out, it gets shipped to the art team for beautification. By the time artists start populating a room with art assets, they already know they will have to minimize decorative details if there are, say, 10 highly tesselated bad guys in a room.
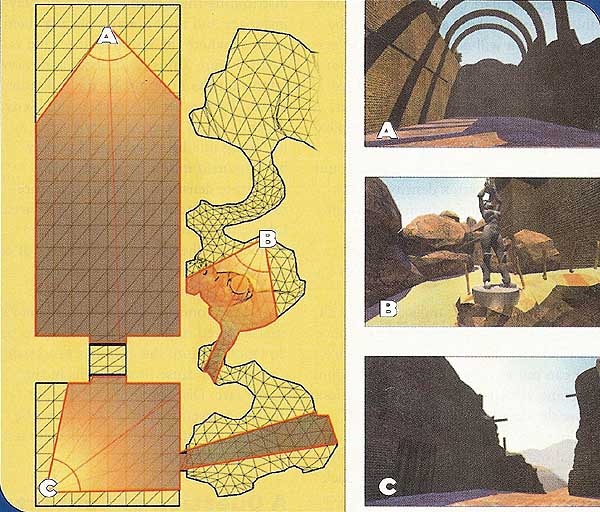
Performance is like laundry: it's a chore, and people only notice it if it's a problem. If your clothes are clean 95 percent of the time, people will only remember -- and judge you by -- those 20 days out of the year where your clothes were not clean. Frame rate is a direct function of all objects in view at a given time, and as such it is most likely to go down when the visual and environmental stimuli are at their peak. Since, in most games, that also happens to be both when players are most enjoying themselves and when they require the most responsiveness out of the system, performance hits can be significant sources of player frustration. Provided that you've been somewhat reasonable in building the art assets of a scene, getting good performance out of it is more about avoiding or offsetting the impact of worst-case scenarios than it is about just "making things go faster." No matter what environment you're building art for -- a heavily occluded starship or a snowy medieval landscape -- always assume players will position themselves in the worst vantage point possible in terms of performance. lf there's a single spot in the entire level the player can sit at and bring all its glorious complexity into view ' at one time, you can rest assured that players will strive to get to it. There are two increasingly common schools of thought in how the art-development workflow works. In the first, art builds a series of set pieces, and then level design assembles and populates levels using them; this method is not unlike a Lego puzzle. In the second scenario, level design builds basic proxy geometry and populates proxy levels with all logic-related entities, then hands it off to art for embellishment. But whether you are a level designer constructing a level from existing building blocks, or part of an art team responsible for embellishing a proxy level, the only way you will achieve a constant performance benchmark is to balance your scene complexity correctly. We will see later that there are several factors that may or may not influence scene complexity, but for the purpose of a high-level assessment, you should take into account three things: the vertex density, the texture density, and the visibility spectrum.. Scene Complexity = Vertex Density * Texture Density * Visibility Spectrum The visibility spectrum is the set of all visible space from a given location. Since the total vertex count and texture space you can put into the visibility spectrum is constant, the larger that space is, the less dense the detail you can pack in it. If you're authoring art for a mostly unoccluded outdoor environment, the amount of vertex and texture data you can pack per cubic meter is probably much lower than it could be if you're authoring contents for heavily occluded interior environments (assuming your engine has some form hierarchical visible surface determination system for occluded environments). In fact, the visibility spectrum is the single most important aspect affecting rendering performance. The smaller you make your visibility spectrum, the more detail you can put in your scenes, and the better your frame rate will be. Typical examples of techniques commonly used to decrease the size of the visibility spectrum include closing off rooms with doors or using transition zones that block off the view for indoor environments (Figures la and Ib), and using fog or depth-of-field effects in external or other typically unoccluded environments. Vertex density is how tightly packed vertices are in a given volume of space. If small areas of the world contain many highly detailed objects, your performance is likely to drop off when they come into view. If you have a few art assets that are particularly expensive, distributing them evenly across the playing space and intentionally placing them in areas where the visibility spectrum is small (Figure lb) is both faster and more important than optimizing the individual pieces. Remember that scene complexity depends on all assets in a given area, including intelligent entities that may have roamed into it by themselves. Texture density is how much texture memory you actually use in a given area. Like vertices, textures can be a severe bottleneck when you concentrate a lot of different textures into a constrained location. When such areas come into view unannounced, all the texture data concentrated in the said area needs to be downloaded to the graphics processor, and this can cause breakdowns in the frame rate. Distributing your texture density as evenly as possible across the visibility spectrum will help alleviate texture-related bottlenecks. So you've examined your level and objects at a high level and fixed what could be fixed, but for gameplay, design, or artistic reasons, you are stuck with certain situations where you need go down to the object level and start making things go faster. Michael Abrash once said that it's more important to know what to optimize than how to optimize. The rule unequivocally rings true in programming circles, but it applies to graphics-related content just as well as it does to graphics code. If you're running into performance problems, blindly optimizing meshes without any previous evaluation of which ones require it is akin to putting all your clean dishes in with the dirty ones each time you run your dishwasher. In fact, unless you are not expected to go anywhere near your performance limits -- a common, if dubious, assumption -- there is a subset of your art assets that you should always carefully optimize. If you're working on a third-person game, chances are your main character will get a lot of attention, a lot of detail, and undergo a lot of iterations. Since the character is always in view, its visual quality bar is much higher. But if always being on-screen is a good reason to lovingly fine-tune a mesh, it's also a prime reason to ensure it is performance friendly. Objects that are always or frequently in view are generally the most detailed, most expensive entities in the game, and by the very fact of their presence on- screen, they also constantly eat up processor time. Objects that are instanced a lot may also make their way onto the screen more often than is readily apparent. Always make sure that you carefully balance visual quality and performance when authoring such content. Since frame rate typically goes down in spurts, common sense dictates that you should be wary of objects that are placed or used in situations that already stress the capacities of the system. Good examples of these include opponents and combat effects. Objects of this nature tend to turn performance problems into performance nightmares, so make sure you identify all stress situations and make their related art assets as performance friendly as possible. Finally, if your performance problem arises in a specific area, then you will want to hit the most expensive objects in that area first. But how does one properly estimate the cost of an object?
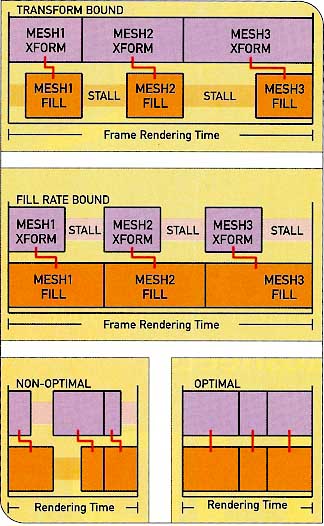
The introduction of programmable vertex and pixel pipelines and the new ability of hardware to blend several texture layers in a single pass has made estimating the rendering cost of an object increasingly difficult. I often found myself giving contradictory guidelines to our art team and on several occasions could not formulate clear explanations on what factors came into play and why, until I realized that, in the end, it came down to a fairly simple set of rules. The first thing to remember is that graphics processors do not understand or care about objects. They deal with portions of an object on a material-by-material basis. If you want to think in terms of performance, the first thing you should do is to decompose your object into its individual materials, then assess the resulting parts one by one. Programmers call the resulting parts surfaces. There are two fundamental things that happen when rendering a surface: its vertices get transformed, and its triangles get drawn. At anyone time, both operations happen in parallel, so that whichever of the two is slowest (draw- ing the triangles or transforming vertices) is roughly how fast a mesh can be rendered (Figure 2).
When assessing a surface's optimization needs, you need to identify both its bottleneck and its cost. The cost will tell you whether you need to optimize it, and the bottleneck will tell you what to optimize. If an object's bottleneck is transform time, then it is said to be "transform-bound," and its cost is the time it takes to transform the vertices attached to it. If an object's bottleneck is fill time, then it is said to be "fill-bound," and its cost is the time it takes to draw the surface on-screen. Game artists therefore need to develop an intuitive sense of whether a surface is likely to be fill-bound or transform-bound. Fill-bound meshes have different (and sometimes opposite) optimization rules from transform-bound meshes. So in order to model -- or optimize -- efficiently, one must decide on which set of rules to follow by assessing whether transform or fill is likely to be the bottleneck. In practice, interactive articulated bodies are generally transform-bound, walls and ceilings tend to be fill-bound, and props lie somewhere in between. But as we'll see, other factors need to be considered when choosing which optimization route to take.
Computational transform cost, the time it takes to transform the vertices, depends on two factors: the transform complexity and the number of vertices to transform. Since programmers like to have nice formulas, I'll attempt to give an abstraction of the trans- form cost here: Transform Cost = Vertex Count * Transform Complexity The transform complexity is how long it takes to convert individual vertices into screen space. It's highly dependent on what kind of transforms your rendering system supports. In Pseudo Interactive's first title, Cel Damage, we supported (in order of increasing complexity) static objects, binary-weighted bones, seven- point quadratic FFD (free-form deformation) cages, and morph targets. As a simple example of this, a static wall or ceiling has a very low transform complexity, while a fully articulated zombie with morphing goose bumps has a very high transform complexity. If your renderer can have multiple lights affect an object, then the complexity of the lighting conditions (how many lights, what type of lights) also affects your transform complexity. The second factor in the equation is vertex count. Surfaces that have a lot of vertices also have a higher total transform cost. If you are authoring content using higher-order surfaces, such as Bezier and B-spline patches, or if you are using hardware-accelerated displacement maps, then your total vertex tally will grow as a function of the tessellation level individual primitives undergo. (All three methods also entail high transform complexity costs.) Otherwise, surfaces that have very low vertex counts are unlikely to have a high transform cost, unless the transformations they undergo are exceptionally complicated or numerous. Weight-blended morph targets, a very high number of bones, or higher-order FFD cages such as tri-cubic (64 points per cage) and tri-quadratic (27 points per cage) solids would fall into that category. Surfaces that have both high vertex counts and a high transform complexity can easily produce major bottlenecks. Now, I've talked about transform costs, but not about the likelihood of a surface being transform-bound. A fork lying on a table might contain few vertices, but the cost associated with drawing such a tiny object is so small, that transform might still be the bottleneck. Hence: Transform-Bound Likelihood = Transform Cost / Fill Cost If the fill cost of a mesh is smaller than the transform cost, an object will be transform-bound (it will take longer to transform) no matter how small the transform cost is (or no matter how large the fill cost is). The bottleneck associated with transform-bound surfaces is related to vertices and transformations, so their performance is generally not affected by the nature of their material or the size of their textures (however, on consoles that require vertices to be resent every frame, texture uploads can compete with vertex uploads for bandwidth). Performance can, however, be affected by the number of successive texture stages applied to the surface: for each platform, there is a hard limit on the number of textures it can blend together before it needs to make a second rendering pass. A separate rendering pass entails retransforming all the vertices of the surface, effectively doubling the transform cost associated with the mesh. Mainstream consoles and PC video cards support anywhere between one and eight textures per pass. Since the number of texture passes a material requires is highly specific, you should consult your programmer to find out when you are causing extra passes to occur.
So what about your average ceiling or wall? Fill time (or draw time) depends largely on the size of the surface on-screen, the number and size of textures involved, and the draw complexity: Fill Cost = Pixel Coverage * Draw Complexity * Texture Density The draw complexity is the complexity of the operations that occur every time a pixel gets drawn. It is typically a function of how many texture passes are involved and what kind of mathematical calculations occur with respect to those passes. In general, sophisticated per-pixel lighting effects, such as bump and normal maps or spherical harmonics, tend to have high draw complexities that grow increasingly complex with the number of lights by which they are affected. Materials that distort the view, such as refractive glass, or materials that cast volumetric shadows, also have very high fill costs. Since you can often combine several such properties on a single surface, the fill cost of multi-pass surfaces can go through the roof. Even if your draw complexity is pretty tame, it's easy to forget the potential bottleneck caused by texture size and density. A wall filled with a giant mural, a high-resolution light map, and a detail map to dirty it up might screw with your texture cache because of the high volume of texture memory to which it refers. No matter what, your surfaces are generally unlikely to have high fill costs if they are small on-screen. But since triangle sizes are pixel-based, higher resolutions or FSAA (full-screen anti-aliasing) modes will directly affect your fill rate by enlarging every triangle's pixel area. The higher the resolution, the more important fill rate becomes. In fact, enabling FSAA is a very common technique to estimate roughly how much of a scene is fill-bound. Surfaces taking up a lot of screen space with either high draw complexities or a lot of texture data can be major bottlenecks. Although you can't exactly make your walls and ceilings any smaller than they are, you should be wary of the material properties you set on those surfaces. The fill-bound likelihood is the inverse of the transform-bound likelihood: Fill-Bound Likelihood = Fill Cost / Transform Cost If the transform cost of a mesh is smaller than the fill cost, an object will be fill-bound (it will take longer to draw) no matter how small the fill cost is (or no matter how large the transform cost is). In any case, if both transform cost and fill cost are low, you should skip the object and concentrate on something more problematic. You may have noticed that the expansion of the fill-bound and transform-bound likelihood equations promptly throws us into programming geek-world. We can abstract it further by extricating the two most significant components out of the equation: vertex counts and pixel coverage. This gives us vertex density, which is really just the vertex count divided by the screen size of an object. Transform-Bound Likelihood = Vertex Density Although this is an extremely simplified abstraction of the fill-bound, transform-bound question, it makes approximating the answer somewhat more manageable: screen vertex density is your best -- if not sole -- indicator in distinguishing transform-bound surfaces from fill-bound surfaces.
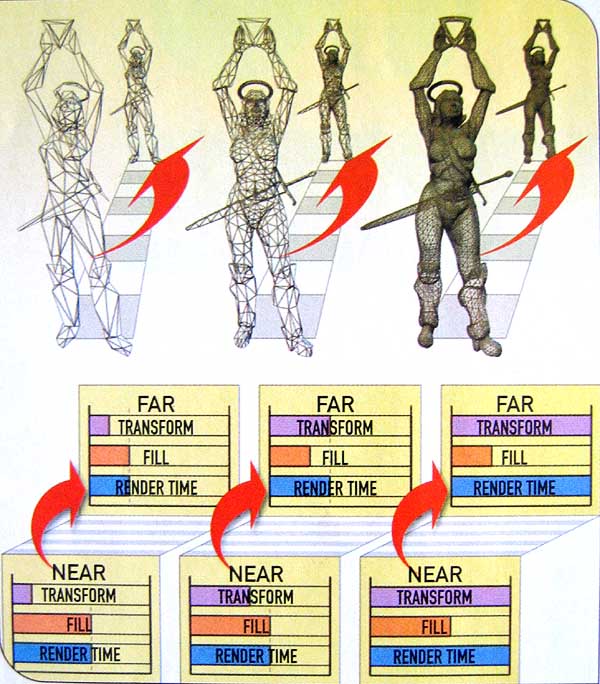
As an artist, it can be difficult to predict the on-screen vertex density of an object during play: as objects get farther into the distance, the on-screen vertex density rises. This can cause large variations in vertex and texture densities to occur when objects are viewed at different distances from the camera (Figure 3).
There are two very important techniques that exist to equilibrate an object's vertex and texture density through distance metrics: discrete levels of detail, and texture mip-maps. Discrete levels of detail (or LOD meshes) replace the full-detail versions of a mesh when it is sufficiently far away from the viewer that the switch produces negligible differences in the rendered image quality. Similarly, mip-maps are lower-detail versions of a texture that can be used when the texel-to-pixel density is sufficiently high. Well-constructed mip-maps will actually enhance your image quality and are an absolute prerequisite to making fill-bound surfaces performance friendly. Although both mip-maps and LOD meshes tend to have a greater impact in outdoor environments, where the very large visibility spectrums call for techniques to minimize the impact of high-detail objects, they both are important to learn and use in all situations. Skimming vertices and textures out of your mesh will never hurt. But, as we'll see next month, optimizing a mesh for best performance is not a piece of cake. So if you're going to go to lengths to make certain objects truly performance friendly -- and in certain cases, you should -- then you should build at least one proper level of detail for them first.
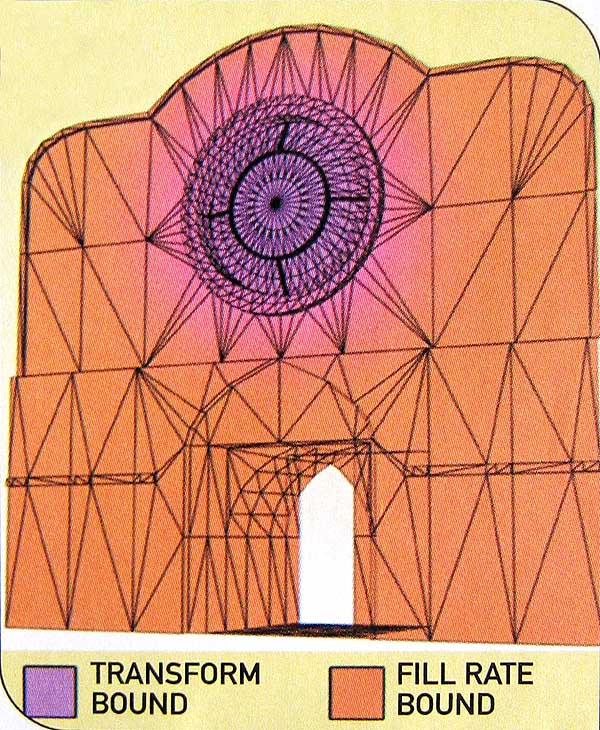
Finally a surface can also cycle between being transform-bound and fill-bound if its vertex density is very non-uniform (Figure 4). Surfaces with both very high and very low curvature areas or surfaces that are adaptively tessellated for lighting conditions typically suffer from this problem. When dealing with such surfaces, remember that it's important to save vertices in the high-density areas, not in the low-density areas where the renderer is likely to be fill-bound. Better yet, try to distribute your vertex density as equitably as possible across its surface area, balancing the load between transform and fill, and maximizing your use of both processing pipelines. There's an exception to this whole system: objects that are always only partly visible. If you were to merge all rooms and corridors of a level into a single object, its resulting vertex density might be low, but you would only ever draw a very small portion of it at every frame. When a surface comes into view, only the visible portion needs to be drawn, but all its vertices need to be transformed and all its textures need to be sent to the card. If -- and only if -- you have objects that have either a significant amount of vertices or large amounts of texture data, and if those objects are too big ever to be entirely in view at once, then you should break them up into smaller pieces. If you do break an object up because of its size, try splitting it in roughly equally distributed volumes to maximize culling efficiency. If your object has a great deal of different materials, try to break up the object in a way that balances the texture load across chunks. Last week, our art staff built a sky box. The texture they applied on it was -- quite understandably -- very detailed. Since its refined color gradations did not palletize very well, we were suddenly stuck with a 512K texture gobbling up almost all of our available texture memory every frame. We correspondingly split the sky box into four sections, so that at any one time, only half of the original texture was required on-screen, unless you looked straight up. Since there isn't all that much to render when you look straight up, splitting in this case was the right call. You'll avoid many performance headaches by paying attention to context and scale. If certain props are consistently located far away from the in-game camera, then you should naturally give them less detail. Similarly, chances are that small objects will be small on-screen too. If you model objects without a scale reference, you are more likely to spend your vertex budget on a scale where the detail will be lost on the player. You've analyzed your scene, made reasonable distribution decisions, and identified certain objects as needing an optimization pass. You found what bottlenecks and costs were likely to be -- but then what? And how does this all affect day-to-day work? In next month's conclusion, we will explore the hands-on modeling and texturing techniques that can be used to reduce cost for both transform-bound and fill-bound surfaces.
Guillaume Provost
|